In this section we will see how rest api image upload in laravel 9 using Laravel-medialibrary. For this tutorial we will create, upload rest api image, edit and update api image, show display multiple with Spatie Media Library.
Step 1: Install Laravel & Connect Database
Run below command to create laravel project.
composer create-project laravel/laravel project-name
Now, you have to connect the laravel app to the database, hence open the .env configuration file and add the database credentials as suggested below.
.env
DB_CONNECTION=mysql
DB_HOST=127.0.0.1
DB_PORT=3306
DB_DATABASE=database_name
DB_USERNAME=database_user_name
DB_PASSWORD=database_password
Step 2: Create Article Modal Migration and Controller
Run below command to create model, migration
php artisan make:model Article -m
create_articles_table.php
public function up()
{
    Schema::create('articles', function (Blueprint $table) {
        $table->id();
        $table->string('title');
        $table->text('content');
        $table->timestamps();
    });
}
Create Api Article Controller
php artisan make:controller Api/ArticleController -r
app/Models/Article.php
<?php

namespace App\Models;

use Illuminate\Database\Eloquent\Factories\HasFactory;
use Illuminate\Database\Eloquent\Model;

class Article extends Model
{
    use HasFactory;

    protected $fillable = [
        'title',
        'content'
    ];
}
Now you need to set api.php route.
routes/api.php
<?php

use App\Http\Controllers\Api\ArticleController;
use Illuminate\Http\Request;
use Illuminate\Support\Facades\Route;

Route::apiResource('articles', ArticleController::class);
Step 3: Install media library laravel
Run below command to install media library.
composer require "spatie/laravel-medialibrary:^10.0.0"
Next, You need to publish the migration to create the media table:
php artisan vendor:publish --provider="Spatie\MediaLibrary\MediaLibraryServiceProvider" --tag="migrations"
After that, you need to run migrations.
php artisan migrate:fresh
Step 4: Prepare Article Model With laravel-medialibrary
Now, you need to add few class laravel-medialibrary ( HasMedia, InteractsWithMedia)
app/Models/Article.php
<?php

namespace App\Models;

use Illuminate\Database\Eloquent\Factories\HasFactory;
use Illuminate\Database\Eloquent\Model;
use Spatie\MediaLibrary\HasMedia;
use Spatie\MediaLibrary\InteractsWithMedia;

class Article extends Model implements HasMedia
{
    use HasFactory, InteractsWithMedia;

    protected $fillable = [
        'title',
        'content'
    ];
}
Now , you need to link storage, so type the command in the terminal and run the command.
php artisan storage:link
Notice: we need to set url path like 8000, or your current server
APP_URL=http://localhost
to
APP_URL=http://localhost:8000
in production you need to your Domain otherwise you are not seen image
Step 5: Create Article Resource
Run below command to create article resource
php artisan make:resource ArticleResource
app/Http/Resources/ArticleResource.php
<?php

namespace App\Http\Resources;

use Illuminate\Http\Resources\Json\JsonResource;

class ArticleResource extends JsonResource
{
    /**
     * Transform the resource into an array.
     *
     * @param  \Illuminate\Http\Request  $request
     * @return array|\Illuminate\Contracts\Support\Arrayable|\JsonSerializable
     */
    public function toArray($request)
    {
        return [
            'id'      =>  $this->id,
            'title'   => $this->title,
            'content' => $this->content,
            'images'  => $this->getFirstMediaUrl('images'),
        ];
    }
}
Step 6: Upload image in Api ArticleController with Spatie Media Library
1. for api we don't need create and edit method.
2. For Show data we need import article resource with the help of resource we can show necessary data.
3. validate data before upload image. then add Spatie Media Library addMediaFromRequest and toMediaCollection
Note: if its doesn't work then try if ($request->images).
app/Http/Api/ArticleController.php
<?php

namespace App\Http\Controllers\Api;

use App\Http\Controllers\Controller;
use App\Http\Resources\ArticleResource;
use App\Models\Article;
use Illuminate\Http\Request;

class ArticleController extends Controller
{
    /**
     * Display a listing of the resource.
     *
     * @return \Illuminate\Http\Response
     */
    public function index()
    {
        $articles = Article::latest()->get();

        return ArticleResource::collection($articles);
    }

    /**
     * Show the form for creating a new resource.
     *
     * @return \Illuminate\Http\Response
     */
    public function create()
    {
        //
    }

    /**
     * Store a newly created resource in storage.
     *
     * @param  \Illuminate\Http\Request  $request
     * @return \Illuminate\Http\Response
     */
    public function store(Request $request)
    {
        $this->validate($request, [
            'title' => 'required|string|max:255',
            'content' => 'required',
            'image' => 'nullable|image|mimes:jpg,png,jpeg,gif,svg|max:2048'
        ]);

        $article = Article::create([
            'title' => $request->title,
            'content' => $request->content
        ]);

        if ($request->hasFile('image')) {
            $article->addMediaFromRequest('image')->toMediaCollection('images');
        }

        return [
            'message' => 'Article created successfully',
            'data' => new ArticleResource($article)
        ];
    }

    /**
     * Display the specified resource.
     *
     * @param  int  $id
     * @return \Illuminate\Http\Response
     */
    public function show($id)
    {
        $article = Article::find($id);

        return new ArticleResource($article);
    }

    /**
     * Show the form for editing the specified resource.
     *
     * @param  int  $id
     * @return \Illuminate\Http\Response
     */
    public function edit($id)
    {
        //
    }

    /**
     * Update the specified resource in storage.
     *
     * @param  \Illuminate\Http\Request  $request
     * @param  int  $id
     * @return \Illuminate\Http\Response
     */
    public function update(Request $request, $id)
    {
        $this->validate($request, [
            'title' => 'required|string|max:255',
            'content' => 'required',
            'image' => 'nullable|image|mimes:jpg,png,jpeg,gif,svg|max:2048'
        ]);
        $article = Article::find($id);
        $article->title = $request->title;
        $article->content = $request->content;
        $article->save();

        if ($request->hasFile('image')) {
            $article->addMediaFromRequest('image')->toMediaCollection('images');
        }

        return [
            'message' => 'Article updated successfully ',
            'data' => new ArticleResource($article)
        ];
    }

    /**
     * Remove the specified resource from storage.
     *
     * @param  int  $id
     * @return \Illuminate\Http\Response
     */
    public function destroy($id)
    {
        $article = Article::find($id);
        $article->delete();

        return response(null, 204);
    }
}
Step 7: Setup and Test Api
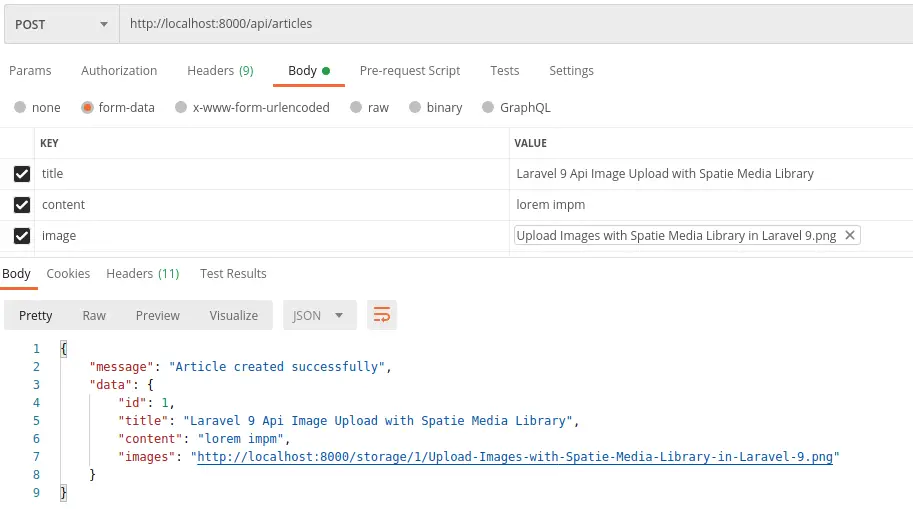
First you need go body section then select form filed for api image upload. then hit http://localhost:8000/api/articles with post method.and set header to Accept to application/json
http://localhost:8000/api/articles

laravel 9 setup api image upload with spatie media library
Store article with upload image using spatie media library
http://localhost:8000/api/articles
laravel rest api upload image with spatie media library
Update article with edit upload image using spatie media library. For update you need to set PUT or Patch method in PostMan.
http://localhost:8000/api/articles/1
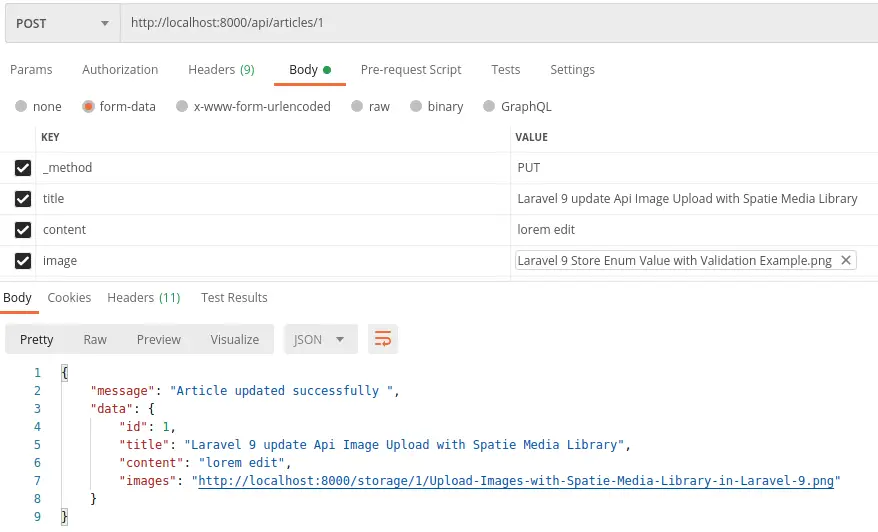
laravel 9 rest api image edit update with spatie media library
Read Also
Laravel 9 Upload Multiple Image Using Spatie Media Library
How To Upload Multiple Images In Laravel 9 With Intervention
Laravel 9 Upload Multiple Images Tutorial Example
How to update multiple images in laravel 9
Upload Images with Spatie Media Library in Laravel 9