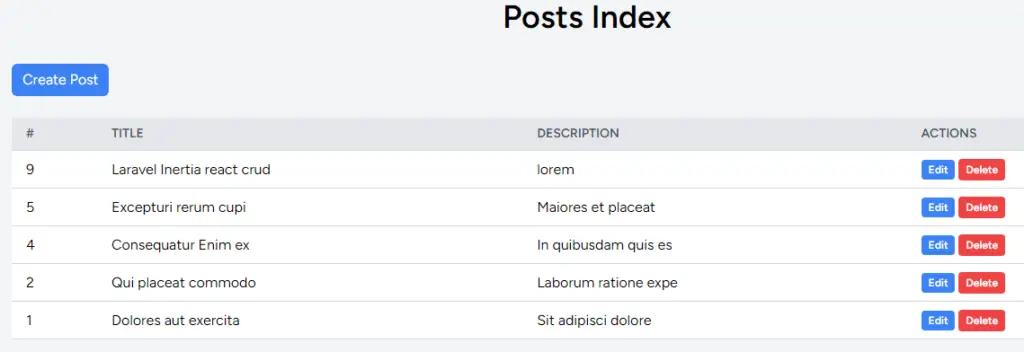
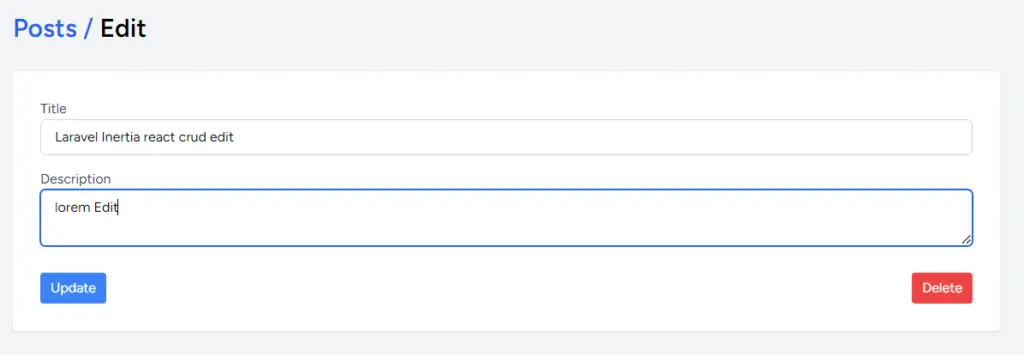
Learn how to build a CRUD application with Laravel, Inertia.js, and React.js. This tutorial will walk you through creating a modern, interactive SPA with Laravel as the backend, Inertia.js for seamless page transitions, and React.js for dynamic front-end features. Let’s dive in and create a powerful web app from scratch!
Step 1: Install Laravel and Configure Database
Installing a fresh new laravel application.
composer create-project laravel/laravel inertia-reactTo connect your Laravel application to a database, you’ll need to update the .env configuration file with your database credentials. Open the .env file and enter your database details as follows:
DB_CONNECTION=mysql
DB_HOST=127.0.0.1
DB_PORT=3306
DB_DATABASE=database_name
DB_USERNAME=database_user_name
DB_PASSWORD=database_password
Step 2: Install Breeze and Set Up Inertia.js with React
Install laravel breeze via composer.
composer require laravel/breeze --devNext, run below command.
php artisan breeze:install Which Breeze stack would you like to install?
Blade with Alpine ................................ blade
Livewire (Volt Class API) with Alpine ............ livewire
Livewire (Volt Functional API) with Alpine ........ livewire-functional
React with Inertia ........................ react
Vue with Inertia ............................... vue
API only .................... api
❯ reactNext, You need to select typescript.
Step 3: Create Post Model and Resource Controller
To create a Post model, migration, and controller, run the following command in your terminal:
php artisan make:model Post -mcr-mgenerates a migration file.-cgenerates a controller.-radds resource methods to the controller.
This command will create:
- A
Postmodel inapp/Models/Post.php. - A migration file in
database/migrations/for thepoststable. - A resource controller in
app/Http/Controllers/PostController.phpwith default CRUD methods.
<?php

use Illuminate\Database\Migrations\Migration;
use Illuminate\Database\Schema\Blueprint;
use Illuminate\Support\Facades\Schema;

return new class extends Migration
{
    /**
     * Run the migrations.
     */
    public function up(): void
    {
        Schema::create('posts', function (Blueprint $table) {
            $table->id();
            $table->string('title');
            $table->text('description');
            $table->timestamps();
        });
    }

    /**
     * Reverse the migrations.
     */
    public function down(): void
    {
        Schema::dropIfExists('posts');
    }
};<?php
namespace App\Models;
use Illuminate\Database\Eloquent\Factories\HasFactory;
use Illuminate\Database\Eloquent\Model;
class Post extends Model
{
protected $fillable = [
'title',
'description'
];
use HasFactory;
}Step 4: Implement Form Request Validation, Update Controller, and Define Routes
To handle validation for creating and updating posts, you need to create a form request. Follow these steps:
- Generate the Form Request:
- Run the following command to create a
StorePostRequestclass:
- Run the following command to create a
php artisan make:request StorePostRequest- Define Validation Rules:
- Open the newly created
PostRequestfile and add your validation rules in therulesmethod. For example:
- Open the newly created
<?php

namespace App\Http\Requests;

use Illuminate\Foundation\Http\FormRequest;

class StorePostRequest extends FormRequest
{
    /**
     * Determine if the user is authorized to make this request.
     */
    public function authorize(): bool
    {
        return true; // Adjust this based on your authorization logic
    }

    /**
     * Get the validation rules that apply to the request.
     *
     * @return array<string, \Illuminate\Contracts\Validation\ValidationRule|array<mixed>|string>
     */
    public function rules(): array
    {
        return [
            'title' => 'required|string|max:255',
            'description' => 'required|string'
        ];
    }
}- Use the Form Request in Your Controller: also add Redirect, Inertia.
<?php

namespace App\Http\Controllers;

use App\Models\Post;
use Illuminate\Http\Request;
use App\Http\Requests\StorePostRequest;
use Illuminate\Support\Facades\Redirect;
use Inertia\Inertia;

class PostController extends Controller
{
    /**
     * Display a listing of the resource.
     */
    public function index()
    {
        $posts = Post::latest()->get();

        return Inertia::render('Post/Index', ['posts' => $posts]);
    }

    /**
     * Show the form for creating a new resource.
     */
    public function create()
    {
        return Inertia::render('Post/Create');
    }

    /**
     * Store a newly created resource in storage.
     */
    public function store(StorePostRequest  $request)
    {
        Post::create(
            $request->validated()
        );
        return Redirect::route('posts.index');

    }

    /**
     * Display the specified resource.
     */
    public function show(Post $post)
    {
        //
    }

    /**
     * Show the form for editing the specified resource.
     */
    public function edit(Post $post)
    {
        return Inertia::render('Post/Edit', [
            'post' => [
                'id' => $post->id,
                'title' => $post->title,
                'description' => $post->description
            ]
        ]);
    }

    /**
     * Update the specified resource in storage.
     */
    public function update(StorePostRequest $request, Post $post)
    {
        $post->update($request->validated());

        return Redirect::route('posts.index');
    }

    /**
     * Remove the specified resource from storage.
     */
    public function destroy(Post $post)
    {
        $post->delete();

        return Redirect::route('posts.index');
    }
}- Define Routes
<?php

use App\Http\Controllers\ProfileController;
use App\Http\Controllers\PostController;
use Illuminate\Foundation\Application;
use Illuminate\Support\Facades\Route;
use Inertia\Inertia;

Route::get('/', function () {
    return Inertia::render('Welcome', [
        'canLogin' => Route::has('login'),
        'canRegister' => Route::has('register'),
        'laravelVersion' => Application::VERSION,
        'phpVersion' => PHP_VERSION,
    ]);
});

Route::get('/dashboard', function () {
    return Inertia::render('Dashboard');
})->middleware(['auth', 'verified'])->name('dashboard');

Route::middleware('auth')->group(function () {
    Route::get('/profile', [ProfileController::class, 'edit'])->name('profile.edit');
    Route::patch('/profile', [ProfileController::class, 'update'])->name('profile.update');
    Route::delete('/profile', [ProfileController::class, 'destroy'])->name('profile.destroy');

});
Route::resource('posts', PostController::class);
require __DIR__.'/auth.php';
Step 5: Create React.js Views for CRUD Operations
- Create the
CreateView
Generate the Create view for adding new posts:
import React from "react";
import { Link, useForm } from "@inertiajs/react";
import AuthenticatedLayout from '@/Layouts/AuthenticatedLayout';
import { PageProps } from '@/types';

// Define the types for form data and errors
interface FormData {
    title: string;
    description: string;
}

interface FormErrors {
    title?: string;
    description?: string;
}

const Create = ({ auth }: PageProps) => {
    const { data, setData, errors, post } = useForm<FormData>({
        title: "",
        description: "",
    });

    // Handle form submission
    function handleSubmit(e: React.FormEvent<HTMLFormElement>) {
        e.preventDefault();
        post(route("posts.store"));
    }

    return (
        <AuthenticatedLayout
            user={auth.user}
            header={<h2 className="font-semibold text-xl text-gray-800 leading-tight">Dashboard</h2>}
        >
                <div className="container mx-auto max-w-7xl">
                    <div>
                        <h1 className="mb-8 text-3xl font-bold mt-8">
                            <Link
                                href={route("posts.index")}
                                className="text-blue-600 font-bold hover:text-blue-700"
                            >
                                Posts
                            </Link>
                            <span className="font-medium text-blue-600"> / </span>
                            Create
                        </h1>
                    </div>
                    <div className="max-w-6xl p-8 bg-white rounded shadow">
                        <form name="createForm" onSubmit={handleSubmit}>
                            <div className="flex flex-col">
                                <div className="mb-4">
                                    <label htmlFor="title" className="block text-gray-700">Title</label>
                                    <input
                                        type="text"
                                        id="title"
                                        className="w-full px-4 py-2 border border-gray-300 rounded-md"
                                        name="title"
                                        value={data.title}
                                        onChange={(e) =>
                                            setData("title", e.target.value)
                                        }
                                    />
                                    {errors.title && (
                                        <span className="text-red-600 text-sm">
                                            {errors.title}
                                        </span>
                                    )}
                                </div>
                                <div className="mb-4">
                                    <label htmlFor="description" className="block text-gray-700">Description</label>
                                    <textarea
                                        id="description"
                                        className="w-full px-4 py-2 border border-gray-300 rounded-md"
                                        name="description"
                                        value={data.description}
                                        onChange={(e) =>
                                            setData("description", e.target.value)
                                        }
                                    />
                                    {errors.description && (
                                        <span className="text-red-600 text-sm">
                                            {errors.description}
                                        </span>
                                    )}
                                </div>
                            </div>
                            <div>
                                <button
                                    type="submit"
                                    className="px-3 py-1.5  text-white bg-blue-500 rounded hover:bg-blue-600"
                                >
                                    Save
                                </button>
                            </div>
                        </form>
                    </div>
                </div>

        </AuthenticatedLayout>
    );
};

export default Create;
- Create the
IndexView
Generate the Index view for listing posts:
import React from "react";
import { Link, usePage, router } from "@inertiajs/react";
import AuthenticatedLayout from '@/Layouts/AuthenticatedLayout';
import { PageProps } from '@/types';

// Define the type for a single post
interface Post {
    id: number;
    title: string;
    description: string;
}

// Adjust the type to reflect the correct structure of posts
interface Posts {
    data: Post[];
}

const Index = ({ auth }: PageProps) => {
    const { posts } = usePage().props;
    const data: Post[] = posts;
    console.log(posts); // Check the structure in the console

    // Function to handle delete action
    const handleDelete = (id: number) => {
        if (confirm("Are you sure you want to delete this post?")) {
            router.delete(route("posts.destroy", id));
        }
    };

    return (
        <AuthenticatedLayout
            user={auth.user}
            header={<h2 className="font-semibold text-xl text-gray-800 leading-tight">Dashboard</h2>}
        >
            <div className="container mx-auto max-w-7xl mt-4">
                <h1 className="mb-8 text-4xl font-bold text-center">Posts Index</h1>
                <div className="flex items-center justify-between mb-6">
                    <Link
                        className="px-3 py-1.5 text-white bg-blue-500 rounded-md focus:outline-none"
                        href={route("posts.create")}
                    >
                        Create Post
                    </Link >
                </div>

                <div className="overflow-x-auto">
                    <table className="min-w-full bg-white">
                        <thead>
                            <tr>
                                <th className="px-4 py-2 bg-gray-200 text-gray-600 border-b border-gray-300 text-left text-sm uppercase font-semibold">
                                    #
                                </th>
                                <th className="px-4 py-2 bg-gray-200 text-gray-600 border-b border-gray-300 text-left text-sm uppercase font-semibold">
                                    Title
                                </th>
                                <th className="px-4 py-2 bg-gray-200 text-gray-600 border-b border-gray-300 text-left text-sm uppercase font-semibold">
                                    Description
                                </th>
                                <th className="px-4 py-2 bg-gray-200 text-gray-600 border-b border-gray-300 text-left text-sm uppercase font-semibold">
                                    Actions
                                </th>
                            </tr>
                        </thead>
                        <tbody>
                            {data.length > 0 ? (
                                data.map(({ id, title, description }) => (
                                    <tr key={id}>
                                        <td className="px-4 py-2 border-b border-gray-300">
                                            {id}
                                        </td>
                                        <td className="px-4 py-2 border-b border-gray-300">
                                            {title}
                                        </td>
                                        <td className="px-4 py-2 border-b border-gray-300">
                                            {description}
                                        </td>
                                        <td className="px-4 py-2 border-b border-gray-300">
                                            <Link
                                                className="bg-blue-500 hover:bg-blue-700 text-white font-bold py-1 px-2 rounded text-xs mr-1"
                                                href={route("posts.edit", id)}
                                            >
                                                Edit
                                            </Link>
                                            <button
                                                className="bg-red-500 hover:bg-red-700 text-white font-bold py-1 px-2 rounded text-xs"
                                                onClick={() => handleDelete(id)} // Trigger delete function
                                            >
                                                Delete
                                            </button>
                                        </td>
                                    </tr>
                                ))
                            ) : (
                                <tr>
                                    <td
                                        className="px-4 py-2 border-b border-gray-300"
                                        colSpan="4"
                                    >
                                        No posts found.
                                    </td>
                                </tr>
                            )}
                        </tbody>
                    </table>
                </div>
            </div>
        </AuthenticatedLayout>
    );
};

export default Index;
- Create the
EditView
Generate the Edit view for updating existing posts:
import React from "react";
import { Link, usePage, useForm, router  } from "@inertiajs/react";
import AuthenticatedLayout from '@/Layouts/AuthenticatedLayout';
import { PageProps } from '@/types';

// Define types for form data and errors
interface Post {
    id: number;
    title: string;
    description: string;
}

interface FormErrors {
    title?: string;
    description?: string;
}

const Edit = ({ auth }: PageProps) => {
    const { post }: { post: Post } = usePage().props;
    const { data, setData, put, errors } = useForm({
        title: post.title || "",
        description: post.description || "",
    });

    function handleSubmit(e: React.FormEvent<HTMLFormElement>) {
        e.preventDefault();
        put(route("posts.update", post.id));
    }

    function destroy() {
        if (confirm("Are you sure you want to delete this post?")) {
            router.delete(route("posts.destroy", post.id));
        }
    }

    return (
        <AuthenticatedLayout
            user={auth.user}
            header={<h2 className="font-semibold text-xl text-gray-800 leading-tight">Dashboard</h2>}
        >
            <div className="container mx-auto max-w-7xl mt-8">
                <div>
                    <h1 className="mb-8 text-3xl font-bold">
                        <Link
                            href={route("posts.index")}
                            className="text-blue-600 hover:text-blue-700"
                        >
                            Posts
                        </Link>
                        <span className="font-medium text-blue-600"> / </span>
                        Edit
                    </h1>
                </div>
                <div className="max-w-6xl p-8 bg-white rounded shadow">
                    <form name="editForm" onSubmit={handleSubmit}>
                        <div className="flex flex-col space-y-4">
                            <div>
                                <label htmlFor="title" className="block text-gray-700">Title</label>
                                <input
                                    type="text"
                                    id="title"
                                    className="w-full px-4 py-2 border border-gray-300 rounded-md"
                                    name="title"
                                    value={data.title}
                                    onChange={(e) =>
                                        setData("title", e.target.value)
                                    }
                                />
                                {errors.title && (
                                    <span className="text-red-600 text-sm">
                                        {errors.title}
                                    </span>
                                )}
                            </div>
                            <div>
                                <label htmlFor="description" className="block text-gray-700">Description</label>
                                <textarea
                                    id="description"
                                    className="w-full px-4 py-2 border border-gray-300 rounded-md"
                                    name="description"
                                    value={data.description}
                                    onChange={(e) =>
                                        setData("description", e.target.value)
                                    }
                                />
                                {errors.description && (
                                    <span className="text-red-600 text-sm">
                                        {errors.description}
                                    </span>
                                )}
                            </div>
                        </div>
                        <div className="flex justify-between mt-6">
                            <button
                                type="submit"
                                className="px-3 py-1.5 text-white bg-blue-500 rounded hover:bg-blue-600"
                            >
                                Update
                            </button>
                            <button
                                onClick={destroy}
                                tabIndex={-1}
                                type="button"
                                className="px-3 py-1.5 text-white bg-red-500 rounded hover:bg-red-600"
                            >
                                Delete
                            </button>
                        </div>
                    </form>
                </div>
            </div>
        </AuthenticatedLayout>
    );
};

export default Edit;
Note: For an efficient development workflow, it’s recommended to use two terminal windows:
- First Terminal: Run your server (e.g.,
php artisan servefor Laravel). - Second Terminal: Execute additional commands as needed (e.g.,
npm run devoryarn devfor building assets).