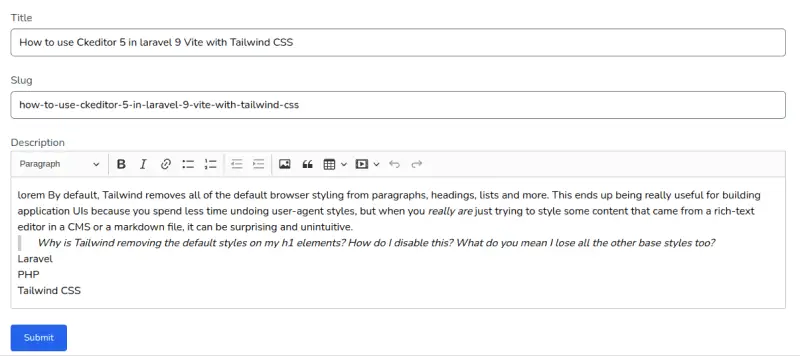
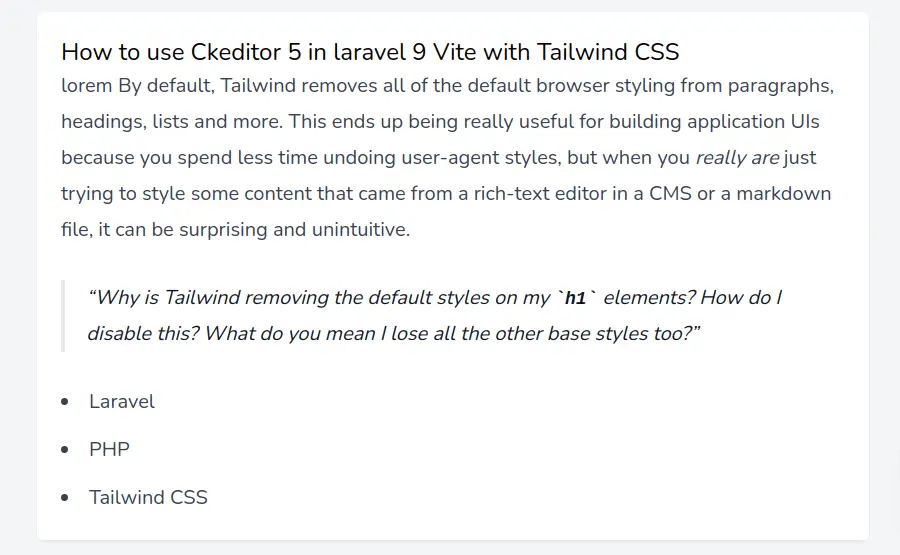
In this section, we’ll see how to integrate CKEditor 5 into Laravel 9 with Vite using Tailwind CSS. We’ll utilize the Laravel Breeze starter kit, which includes Tailwind CSS and Alpine.js, and supports Vite out of the box. Additionally, we’ll make use of the Tailwind Typography plugin, which provides support for Markdown in the editor.
Tool Use
Laravel
Laravel Breeze
Tailwind CSS & Alpinejs
Ckeditor 5 CDN
Tailwind CSS Typography Plugin
Step 1: Create Laravel Project and Connect Database
Installing a fresh new laravel application.
composer create-project laravel/laravel project-nameNow, you need to connect the Laravel app to the database. Open the .env configuration file and add the database credentials as suggested below.
DB_CONNECTION=mysql
DB_HOST=127.0.0.1
DB_PORT=3306
DB_DATABASE=database_name
DB_USERNAME=database_user_name
DB_PASSWORD=database_password
Step 2: Install Laravel Breeze
Next, you need install laravel breeze via composer.
composer require laravel/breeze --devInstall breeze scaffold.
php artisan breeze:installInstall npm and migrate database.
npm install
npm run dev
php artisan migrate
Step 3: Create Post Modal Migration Controller and Route
Run below to create post model, migration and controller.
php artisan make:model Post -mcrcreate_posts_table.php
public function up()
{
    Schema::create('posts', function (Blueprint $table) {
        $table->id();
        $table->string('title');
        $table->string('slug');
        $table->longText('description');
        $table->timestamps();
    });
}
Run migrate again
php artisan migrateapp/Models/Post.php
<?php

namespace App\Models;

use Illuminate\Database\Eloquent\Factories\HasFactory;
use Illuminate\Database\Eloquent\Model;

class Post extends Model
{
    use HasFactory;

    protected $fillable = [
        'title',
        'slug',
        'description',
    ];
}
Now create roues.
<?php
use App\Http\Controllers\PostController;
use Illuminate\Support\Facades\Route;

/*
|--------------------------------------------------------------------------
| Web Routes
|--------------------------------------------------------------------------
|
| Here is where you can register web routes for your application. These
| routes are loaded by the RouteServiceProvider within a group which
| contains the "web" middleware group. Now create something great!
|
*/

Route::get('/', function () {
    return view('welcome');
});

Route::get('/dashboard', function () {
    return view('dashboard');
})->middleware(['auth'])->name('dashboard');
Route::resource('posts', PostController::class);
require __DIR__.'/auth.php';
app/Http/Controllers/PostController.php
<?php

namespace App\Http\Controllers;

use App\Models\Post;
use Illuminate\Http\Request;

class PostController extends Controller
{
    /**
     * Display a listing of the resource.
     *
     * @return \Illuminate\Http\Response
     */
    public function index()
    {
        $posts = Post::latest()->paginate(10);

        return view('posts.index', compact('posts'));
    }

    /**
     * Show the form for creating a new resource.
     *
     * @return \Illuminate\Http\Response
     */
    public function create()
    {
        return view('posts.create');
    }

    /**
     * Store a newly created resource in storage.
     *
     * @param  \Illuminate\Http\Request  $request
     * @return \Illuminate\Http\Response
     */
    public function store(Request $request)
    {
        $request->validate([
            'title' => 'required|string|max:255',
            'slug' => 'required|string|max:255',
            'description' => 'required',
        ]);
        Post::create([
            'title' => $request->title,
            'slug' => str()->slug($request->slug),
            'description' => $request->description,
        ]);

        return redirect()->route('posts.index')->with('message', 'Post Created Successfully');
    }

    /**
     * Display the specified resource.
     *
     * @param  \App\Models\Post  $post
     * @return \Illuminate\Http\Response
     */
    public function show(Post $post)
    {
        return view('posts.show', compact('post'));
    }

    /**
     * Show the form for editing the specified resource.
     *
     * @param  \App\Models\Post  $post
     * @return \Illuminate\Http\Response
     */
    public function edit(Post $post)
    {
        //
    }

    /**
     * Update the specified resource in storage.
     *
     * @param  \Illuminate\Http\Request  $request
     * @param  \App\Models\Post  $post
     * @return \Illuminate\Http\Response
     */
    public function update(Request $request, Post $post)
    {
        //
    }

    /**
     * Remove the specified resource from storage.
     *
     * @param  \App\Models\Post  $post
     * @return \Illuminate\Http\Response
     */
    public function destroy(Post $post)
    {
        //
    }
}
Step 4: Create view blade file
First, you need to add @stack('scripts') in the views/layouts/app.blade.php file.
views/layouts/app.blade.php
<!DOCTYPE html>
<html lang="{{ str_replace('_', '-', app()->getLocale()) }}">

    <head>
        <meta charset="utf-8">
        <meta name="viewport" content="width=device-width, initial-scale=1">
        <meta name="csrf-token" content="{{ csrf_token() }}">

        <title>{{ config('app.name', 'Laravel') }}</title>

        <!-- Fonts -->
        <link rel="stylesheet" href="https://fonts.googleapis.com/css2?family=Nunito:wght@400;600;700&display=swap">
        <!-- Scripts -->
        @vite(['resources/css/app.css', 'resources/js/app.js'])

    </head>

    <body class="font-sans antialiased">
        <div class="min-h-screen bg-gray-100">
            @include('layouts.navigation')

            <!-- Page Heading -->
            <header class="bg-white shadow">
                <div class="px-4 py-6 mx-auto max-w-7xl sm:px-6 lg:px-8">
                    {{ $header }}
                </div>
            </header>

            <!-- Page Content -->
            <main>
                {{ $slot }}
            </main>
        </div>
        @stack('scripts')
    </body>

</html>
view/posts/create.blade.php
<x-app-layout>
    <x-slot name="header">
        <h2 class="text-xl font-semibold leading-tight text-gray-800">
            {{ __('Post Create') }}
        </h2>
    </x-slot>

    <div class="py-12">
        <div class="mx-auto max-w-7xl sm:px-6 lg:px-8">
            <div class="overflow-hidden bg-white shadow-sm sm:rounded-lg">
                <div class="p-6 bg-white border-b border-gray-200">
                    <form method="POST" action="{{ route('posts.store') }}">
                        @csrf
                        <div class="mb-6">
                            <label class="block">
                                <span class="text-gray-700">Title</span>
                                <input type="text" name="title"
                                    class="block w-full @error('title') border-red-500 @enderror mt-1 rounded-md"
                                    placeholder="" value="{{old('title')}}" />
                            </label>
                            @error('title')
                            <div class="text-sm text-red-600">{{ $message }}</div>
                            @enderror
                        </div>
                        <div class="mb-6">
                            <label class="block">
                                <span class="text-gray-700">Slug</span>
                                <input type="text" name="slug"
                                    class="block w-full @error('slug') border-red-500 @enderror mt-1 rounded-md"
                                    placeholder="" value="{{old('slug')}}" />
                            </label>
                            @error('slug')
                            <div class="text-sm text-red-600">{{ $message }}</div>
                            @enderror
                        </div>
                        <div class="mb-6">
                            <label class="block">
                                <span class="text-gray-700">Description</span>
                                <textarea id="editor" class="block w-full mt-1 rounded-md" name="description" rows="3"></textarea>
                            </label>
                            @error('description')
                            <div class="text-sm text-red-600">{{ $message }}</div>
                            @enderror
                        </div>
                        <button type="submit"
                            class="text-white bg-blue-600  rounded text-sm px-5 py-2.5">Submit</button>

                    </form>
                </div>
            </div>
        </div>
    </div>
    @push('scripts')
    <script src="https://cdn.ckeditor.com/ckeditor5/34.2.0/classic/ckeditor.js"></script>
    <script>
        ClassicEditor
            .create( document.querySelector( '#editor' ) )
            .catch( error => {
                console.error( error );
            } );
    </script>
    @endpush
</x-app-layout>
Step 5: Install & Setup Tailwind CSS Typography
install tailwind CSS typography.
npm install -D @tailwindcss/typographyThen add the plugin to your tailwind.config.js file:
tailwind.config.js
const defaultTheme = require('tailwindcss/defaultTheme');

/** @type {import('tailwindcss').Config} */
module.exports = {
    content: [
        './vendor/laravel/framework/src/Illuminate/Pagination/resources/views/*.blade.php',
        './storage/framework/views/*.php',
        './resources/views/**/*.blade.php',
    ],

    theme: {
        extend: {
            fontFamily: {
                sans: ['Nunito', ...defaultTheme.fontFamily.sans],
            },
        },
    },

    plugins: [require('@tailwindcss/forms'),require('@tailwindcss/typography')],
};
run vite.
npm run devStep 6: Install Typography Plugin For Markdown
To display Laravel CKEditor content, you’ll need to install the Tailwind CSS Typography plugin, which supports CKEditor 5 Markdown. You can use any editor with the Typography plugin.
Next, add the typography class prose lg:prose-xl to the description div.
view/posts/show.blade.php
<x-app-layout>
    <x-slot name="header">
        <h2 class="text-xl font-semibold leading-tight text-gray-800">
            {{ __('Posts Show') }}
        </h2>
    </x-slot>

    <div class="py-12">
        <div class="mx-auto max-w-7xl sm:px-6 lg:px-8">
            <div class="overflow-hidden bg-white shadow-sm sm:rounded-lg">
                <div class="p-6 bg-white border-b border-gray-200">
                    <div>
                        <h1 class="text-2xl">{{ $post->title }}</h1>
                        <div class="prose lg:prose-xl">{!! $post->description !!}</div>
                    </div>

                </div>
            </div>
        </div>
    </div>

</x-app-layout>
Step 7: Run the server
run vite build
npm run dev
# or
npm run build
run laravel server
php artisan serve